10 Vintage Furniture Makeovers with Ideas + Tips (Before & After Photos)
Have you ever spotted a discarded piece of furniture on the curb, or a dusty mid-century gem at an estate sale, and wondered if it was worth saving? The answer is almost always a resounding yes.
With a little patience, some sandpaper, and the right fabric, you can transform unloved vintage furniture into a custom home decor piece you’ll enjoy for years (or decades!) to come. In this post, I am digging deep into my DIY project archives and sharing 10 incredible vintage furniture makeover stories to inspire your next DIY project. From favorite mid-century modern furniture scores to budget-friendly yard sale saves, these step-by-step transformations prove that old furniture always deserves a second chance.

What You Will Learn from These Furniture Makeover Projects:
- Mid-Century Modern Rescues: How to restore iconic mid-century furniture.
- Budget-Friendly Furniture Hacks: Creative ways to flip cheap thrift finds for under $50.
- Paint & Wood Refinishing Tips: Simple techniques for reviving wood and painting old furniture.
- Upholstery Tips: How to choose upholstery fabric, plus when to DIY and when to call in the pros.
Use the table of contents below to jump straight to your favorite furniture makeover – or keep scrolling to see all of the before & after furniture transformations.
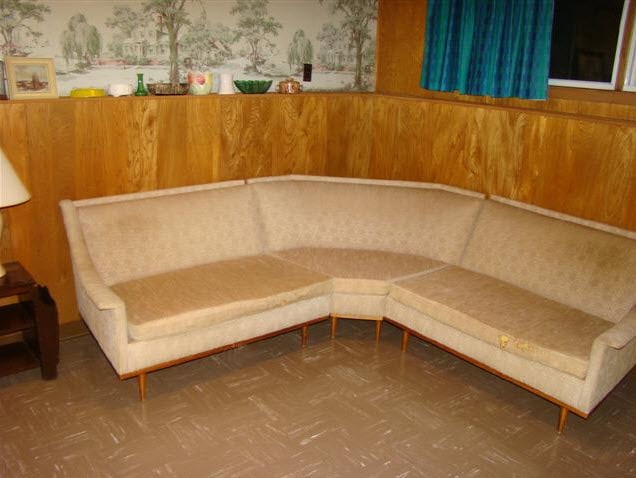
Mid-Century Sectional Sofa Rescue
- The Before: A sad, sagging, ripped mid-century couch from an estate sale.
- The Idea: A professional mid-century sofa restoration with new foam, upholstery, and refinished wood. Sometimes a DIYer needs to know when to call in the pros!
- Pro Tip: Use leftover fabric for a custom cushion to turn an old coffee table into a matching ottoman (see the mid-century couch makeover story for the ottoman hack details).
This beautifully restored vintage sofa with its new upholstery and refinished wood legs is one of my favorite vintage furniture transformations. Even though this wasn’t a DIY upholstery project, we poured hours into sourcing the best fabric. Check out my tips for picking upholstery fabric. We almost chose an inky teal but, although mid-century living room furniture can definitely look perfect in bold fabrics, in this very small space a soft dove grey helps keep the larger piece from overwhelming the room.
➜ See the full step-by-step tutorial and product list here: Mid-Century Sectional Sofa Makeover Before & After
The Vintage Couch Before:
The Restored Retro Sectional After:

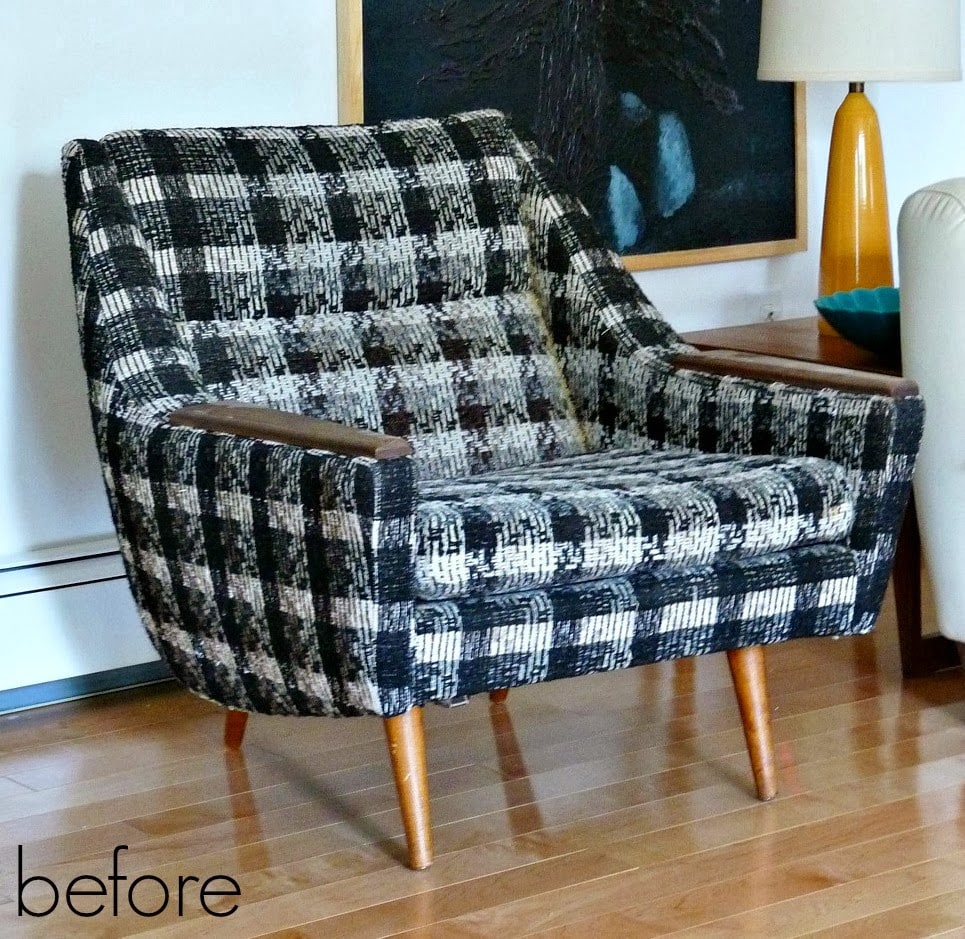
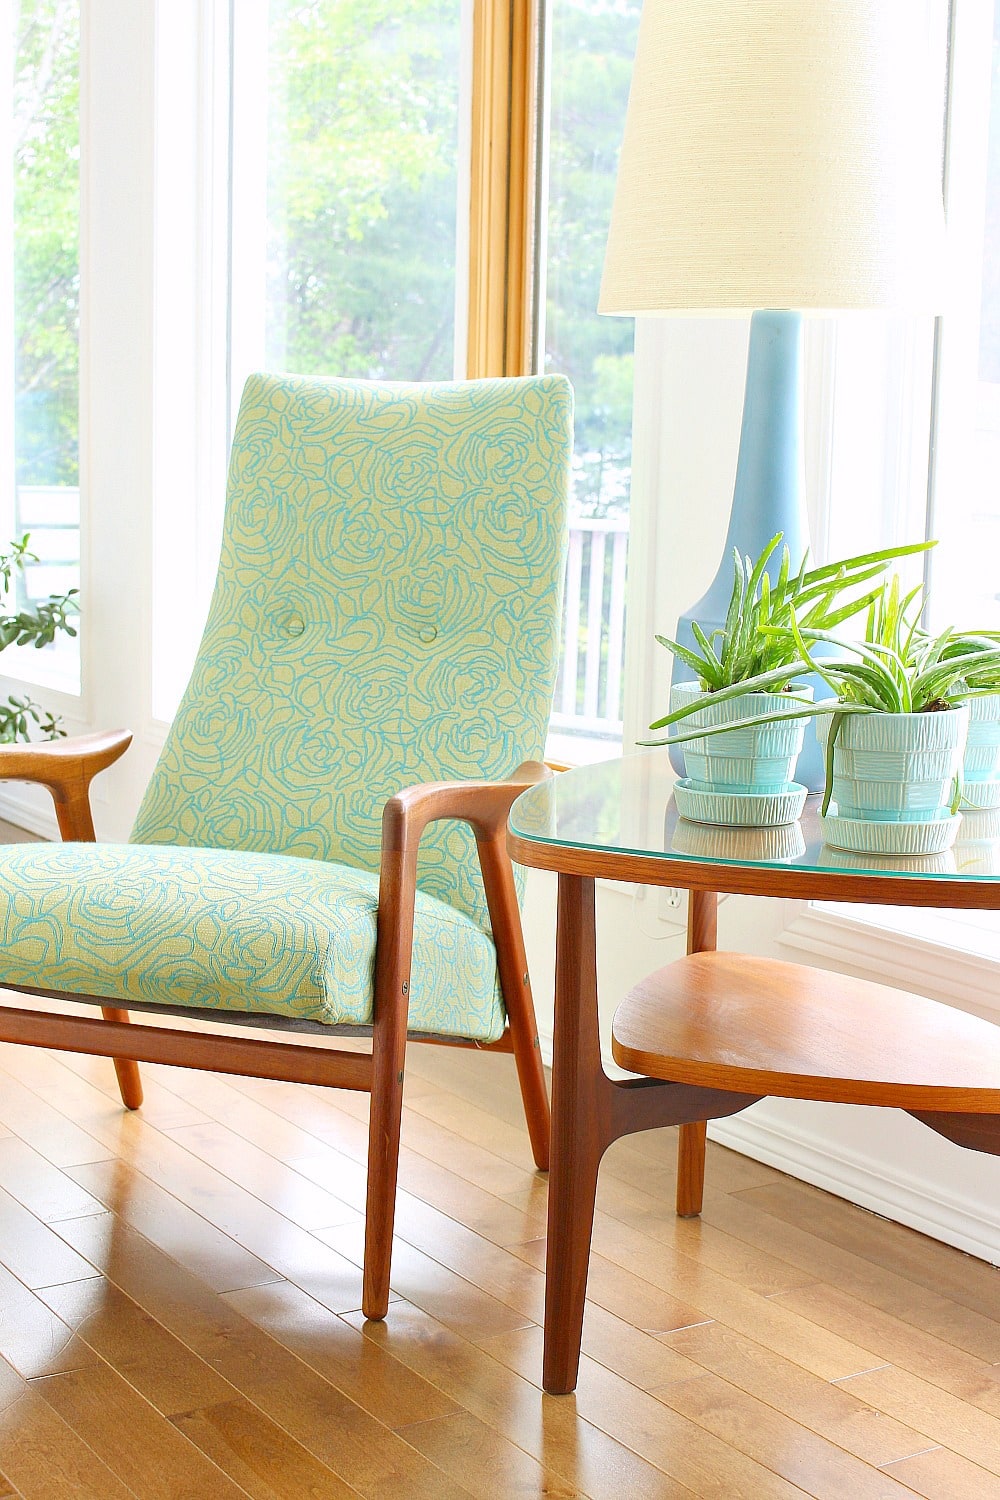
Trash Heap Vintage Chair Revival
- The Before: A discarded mid-century chair rescued straight from a trash heap.
- The Idea: A hybrid restoration: the wood arms and legs were fully stripped and refinished as a DIY project, while the body was sent to a professional to be recovered in a luxurious teal velvet upholstery fabric.
- Pro Tip: When rescuing furniture from the trash, always inspect the frame for pests or structural cracks before bringing it into your vehicle or home.
I found this chair in a trash heap on the way to a Weezer concert. Hubby VERY reluctantly pulled the car over – he didn’t see the vision. That was back in 2013 and this has remained one of my favorite vintage furniture pieces. The clean lines of this mid-century modern chair in a beautiful teal upholstery have worked so beautifully in so many different rooms. If you’re not sure what fabric is suitable for furniture upholstery, check out my tips for picking upholstery fabric.
➜ See the full step-by-step tutorial and product list here: Mid-Century Chair Makeover Before & After
The Vintage Chair Before:
The Mid-Century Velvet Chair After:

Yngve Ekström Mingo Chair Score
- The Before: A worn out and ripped mid-century designer chair picked up through a local classified want ad for only $250.
- The Idea: A beautiful and bold restoration of a rare piece. I gave the dehydrated teak wood a thorough clean and oil, and the body was professionally recovered in a bold, eye-catching patterned fabric.
- Pro Tip: When restoring wood arms and legs on vintage furniture, do it before the reupholstery process so you can get messy and thoroughly deep clean every crevice and oil the wood without worrying about staining the fabric.
Sometimes, finding the perfect vintage piece requires getting creative with your sourcing. I placed a “want ad” online looking for any vintage chair, and I ended up scoring this rare and valuable Yngve Ekström Mingo chair for an absolute steal! I wanted to do it justice with a professional upholstery job. While solid colors are a safe bet, on the advice of the amazing staff at my favorite upholsterer, we went all out with a bold pattern this time. The end result pays homage to the bold choices of mid-century modern design and the curvy abstract flowers complement the curvy lines of the chair. If you are stuck on your own design choices, check out my tips for picking upholstery fabric.
➜ ➜ See the full step-by-step tutorial and product list here: Vintage Teak Chair Makeover Before & After
The Vintage Teak Chair Before:

The Reupholstered Vintage Teak Chair After:
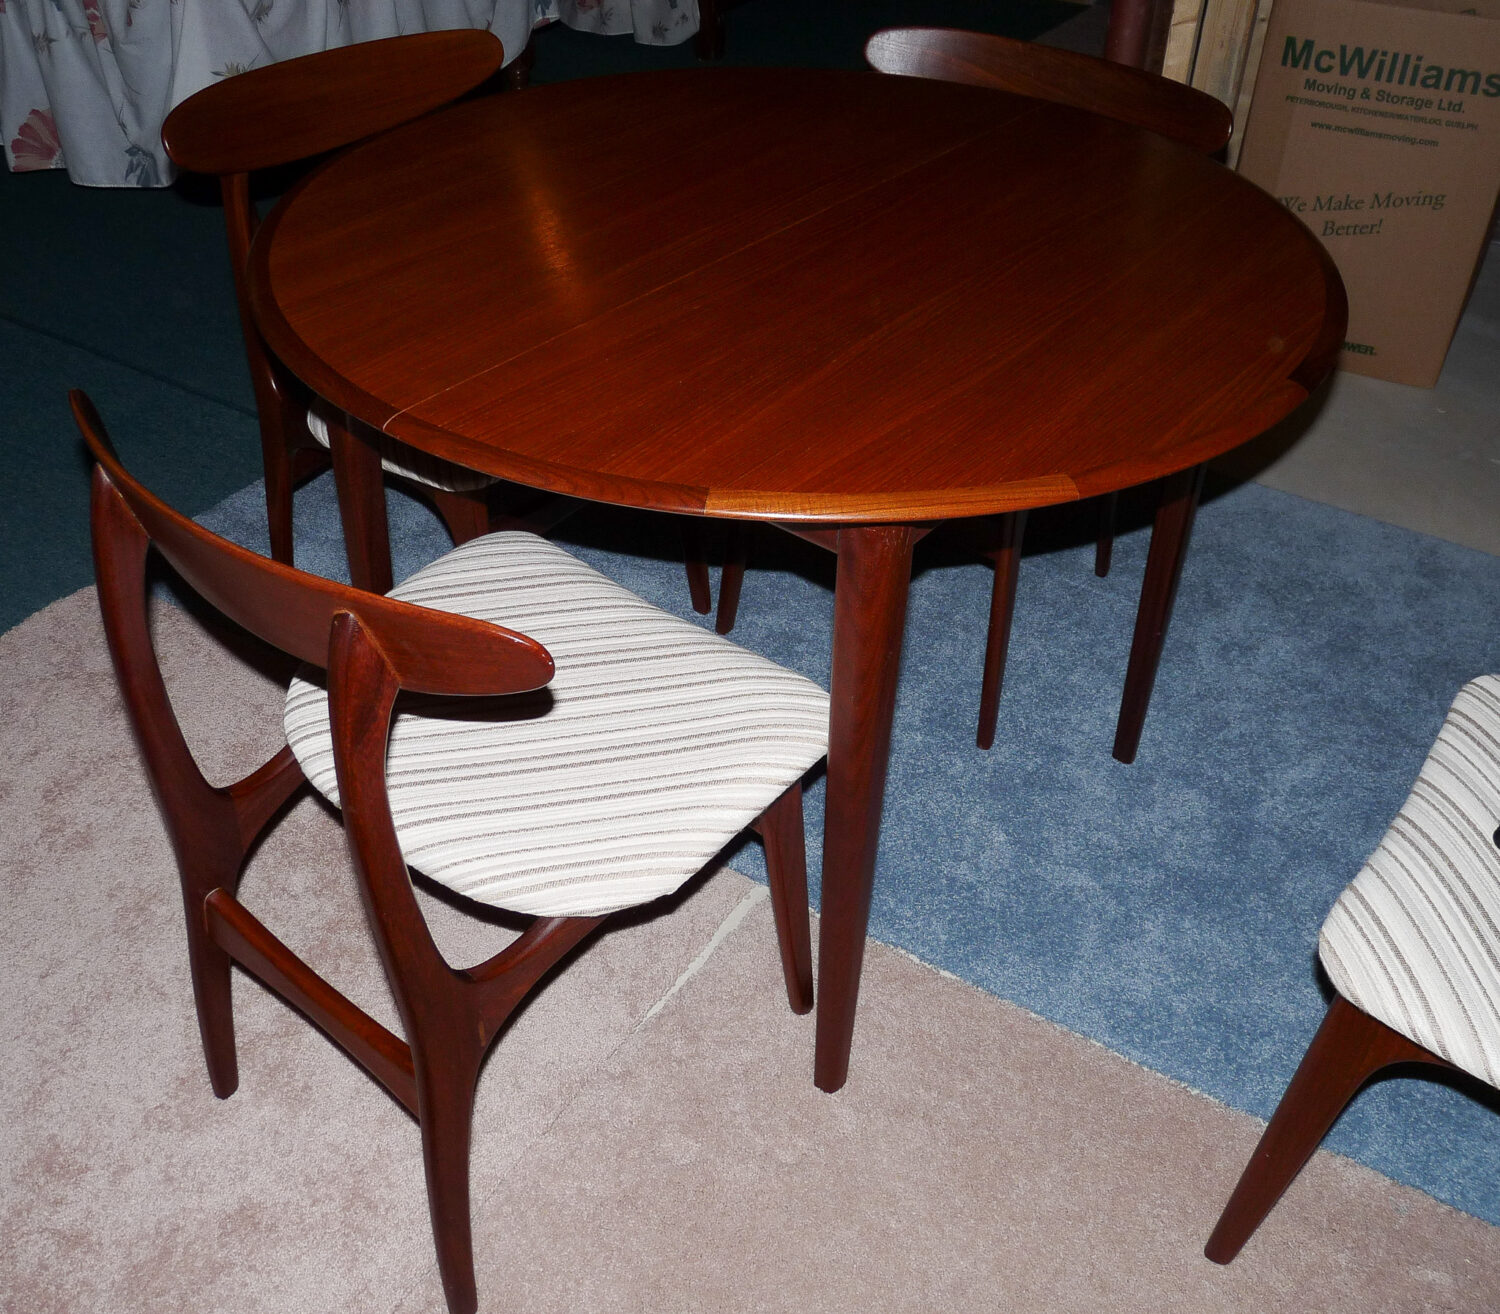
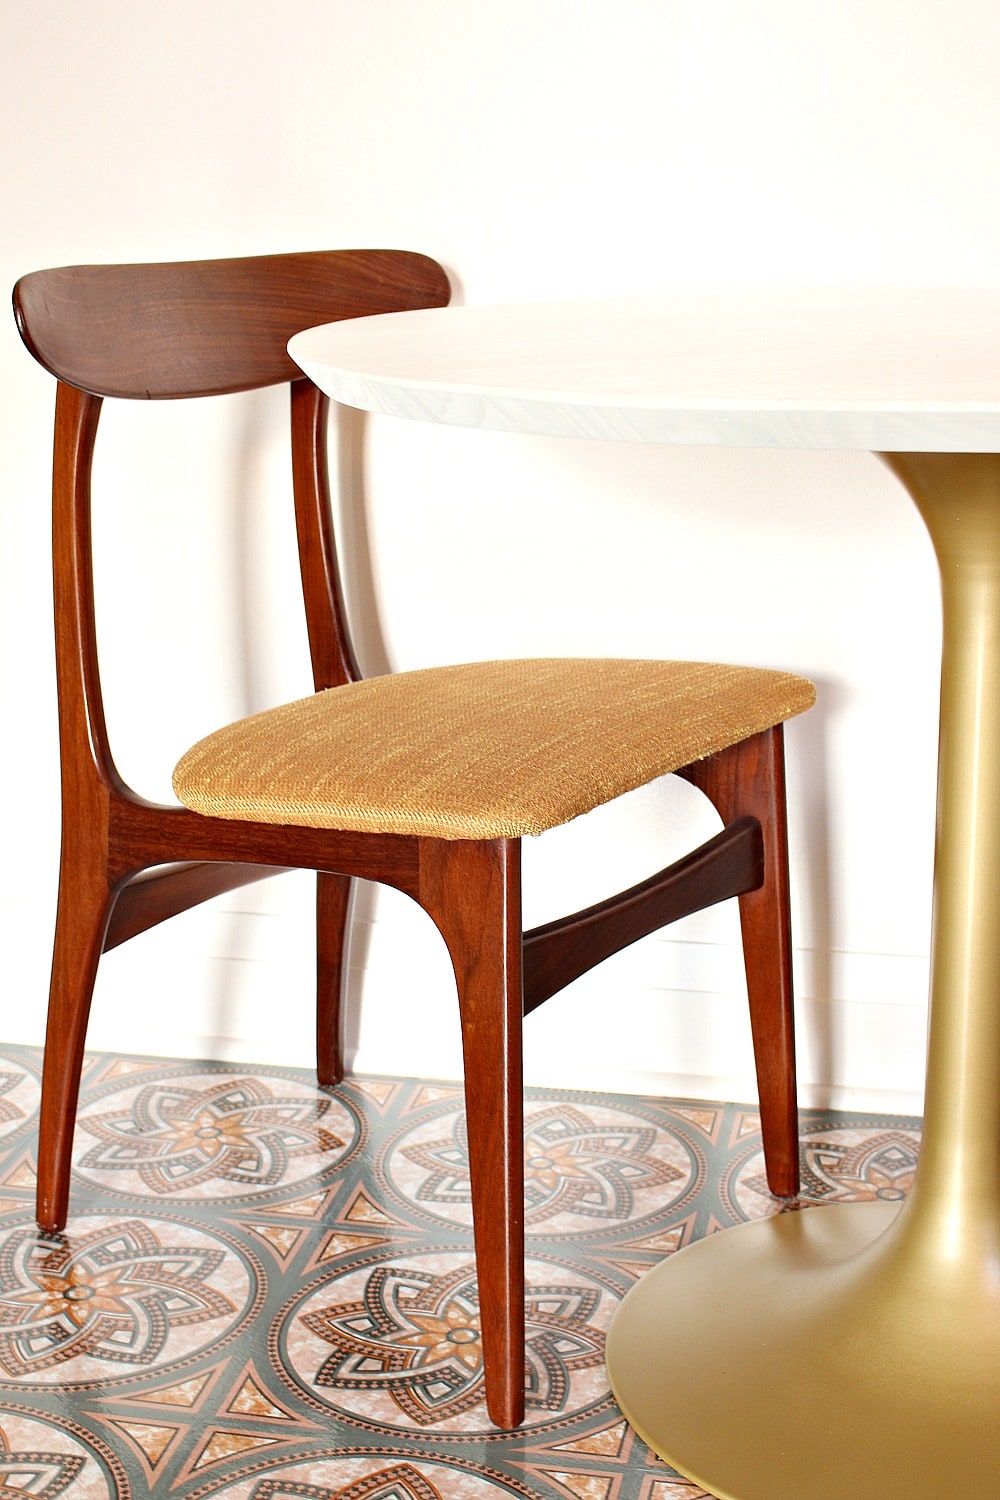
Double-Makeover Mid-Century Teak Dining Chairs
- The Before: A set of worn mid-century modern teak dining chairs scored as part of a $500 table set in the local classifieds.
- The Idea: A true DIY upholstery project that proves you can change your mind! These mid-century dining chairs were first updated for a graphic vintage kitchen, and later completely reimagined to fit a soft, retro color palette.
- Pro Tip: Don’t be afraid to change your upholstery if your style evolves! Classic mid-century dining chairs with pop-out seats are some of the easiest pieces to recover yourself using a heavy-duty staple gun.
Just before moving into our first house, I found a beautiful mid-century teak dining table and chairs set for only $500 in the classifieds. Originally, I recovered the chairs in a striking black and white houndstooth pattern to fit our vintage wood kitchen design. Years later, I stripped them down and recovered them a second time in a warm apricot tweed. This new look was the perfect custom touch for my mom’s grey and pink kitchen makeover, showing just how versatile classic teak furniture can be. (Keep scrolling to see her version of the chairs and the tulip table makeover we paired them with.)
➜ See the original full step-by-step tutorial and product list here: How to Upholster Dining Chairs
The Vintage Teak Dining Chairs Before:
The Mid-Century Teak Dining Chairs After:

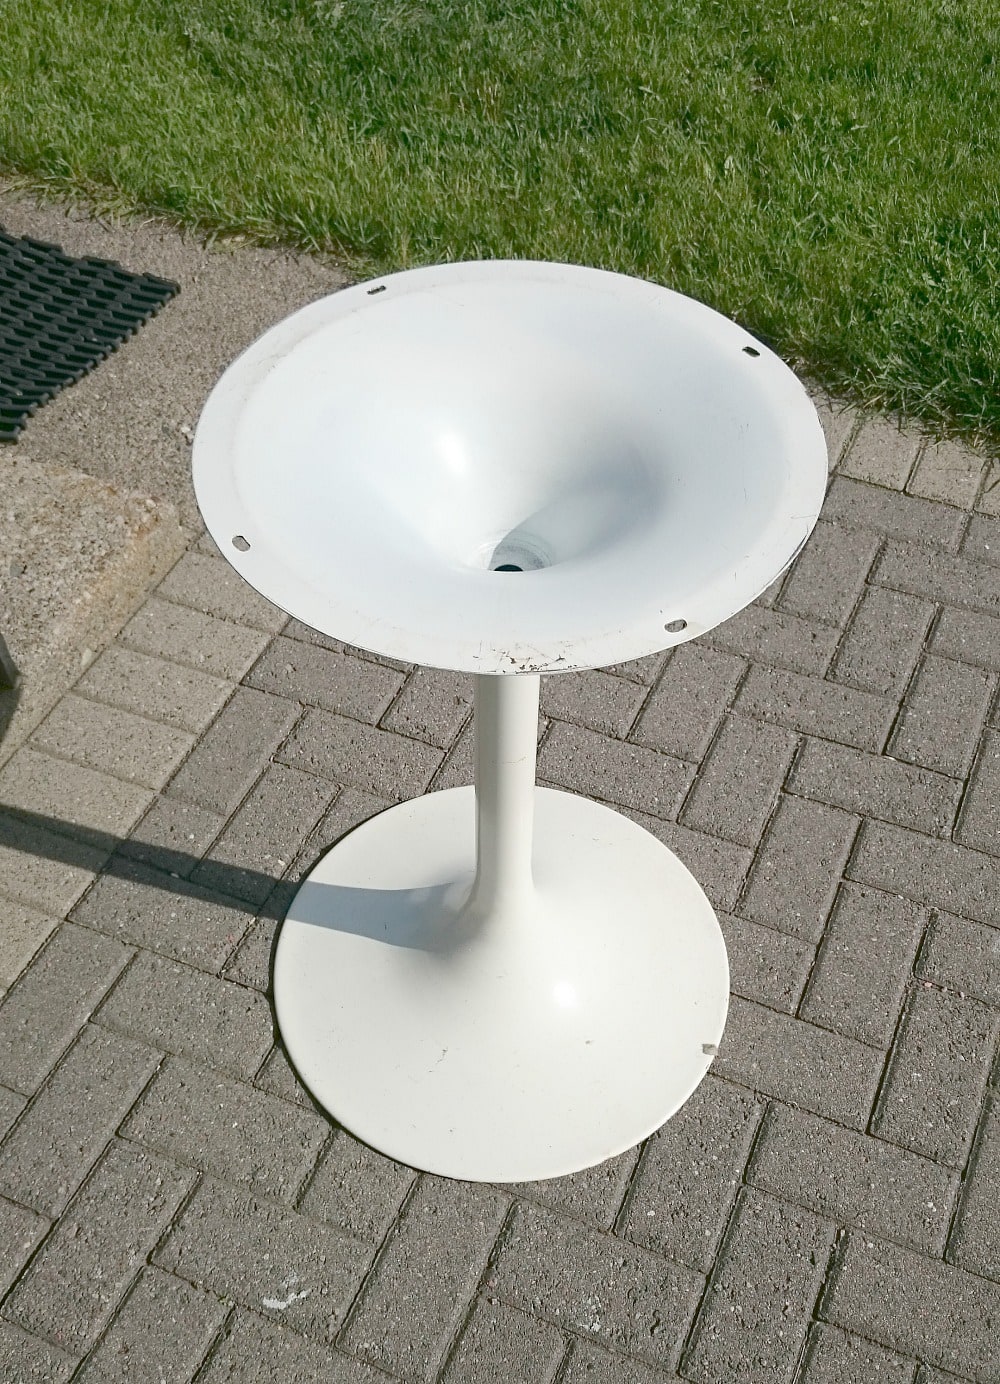
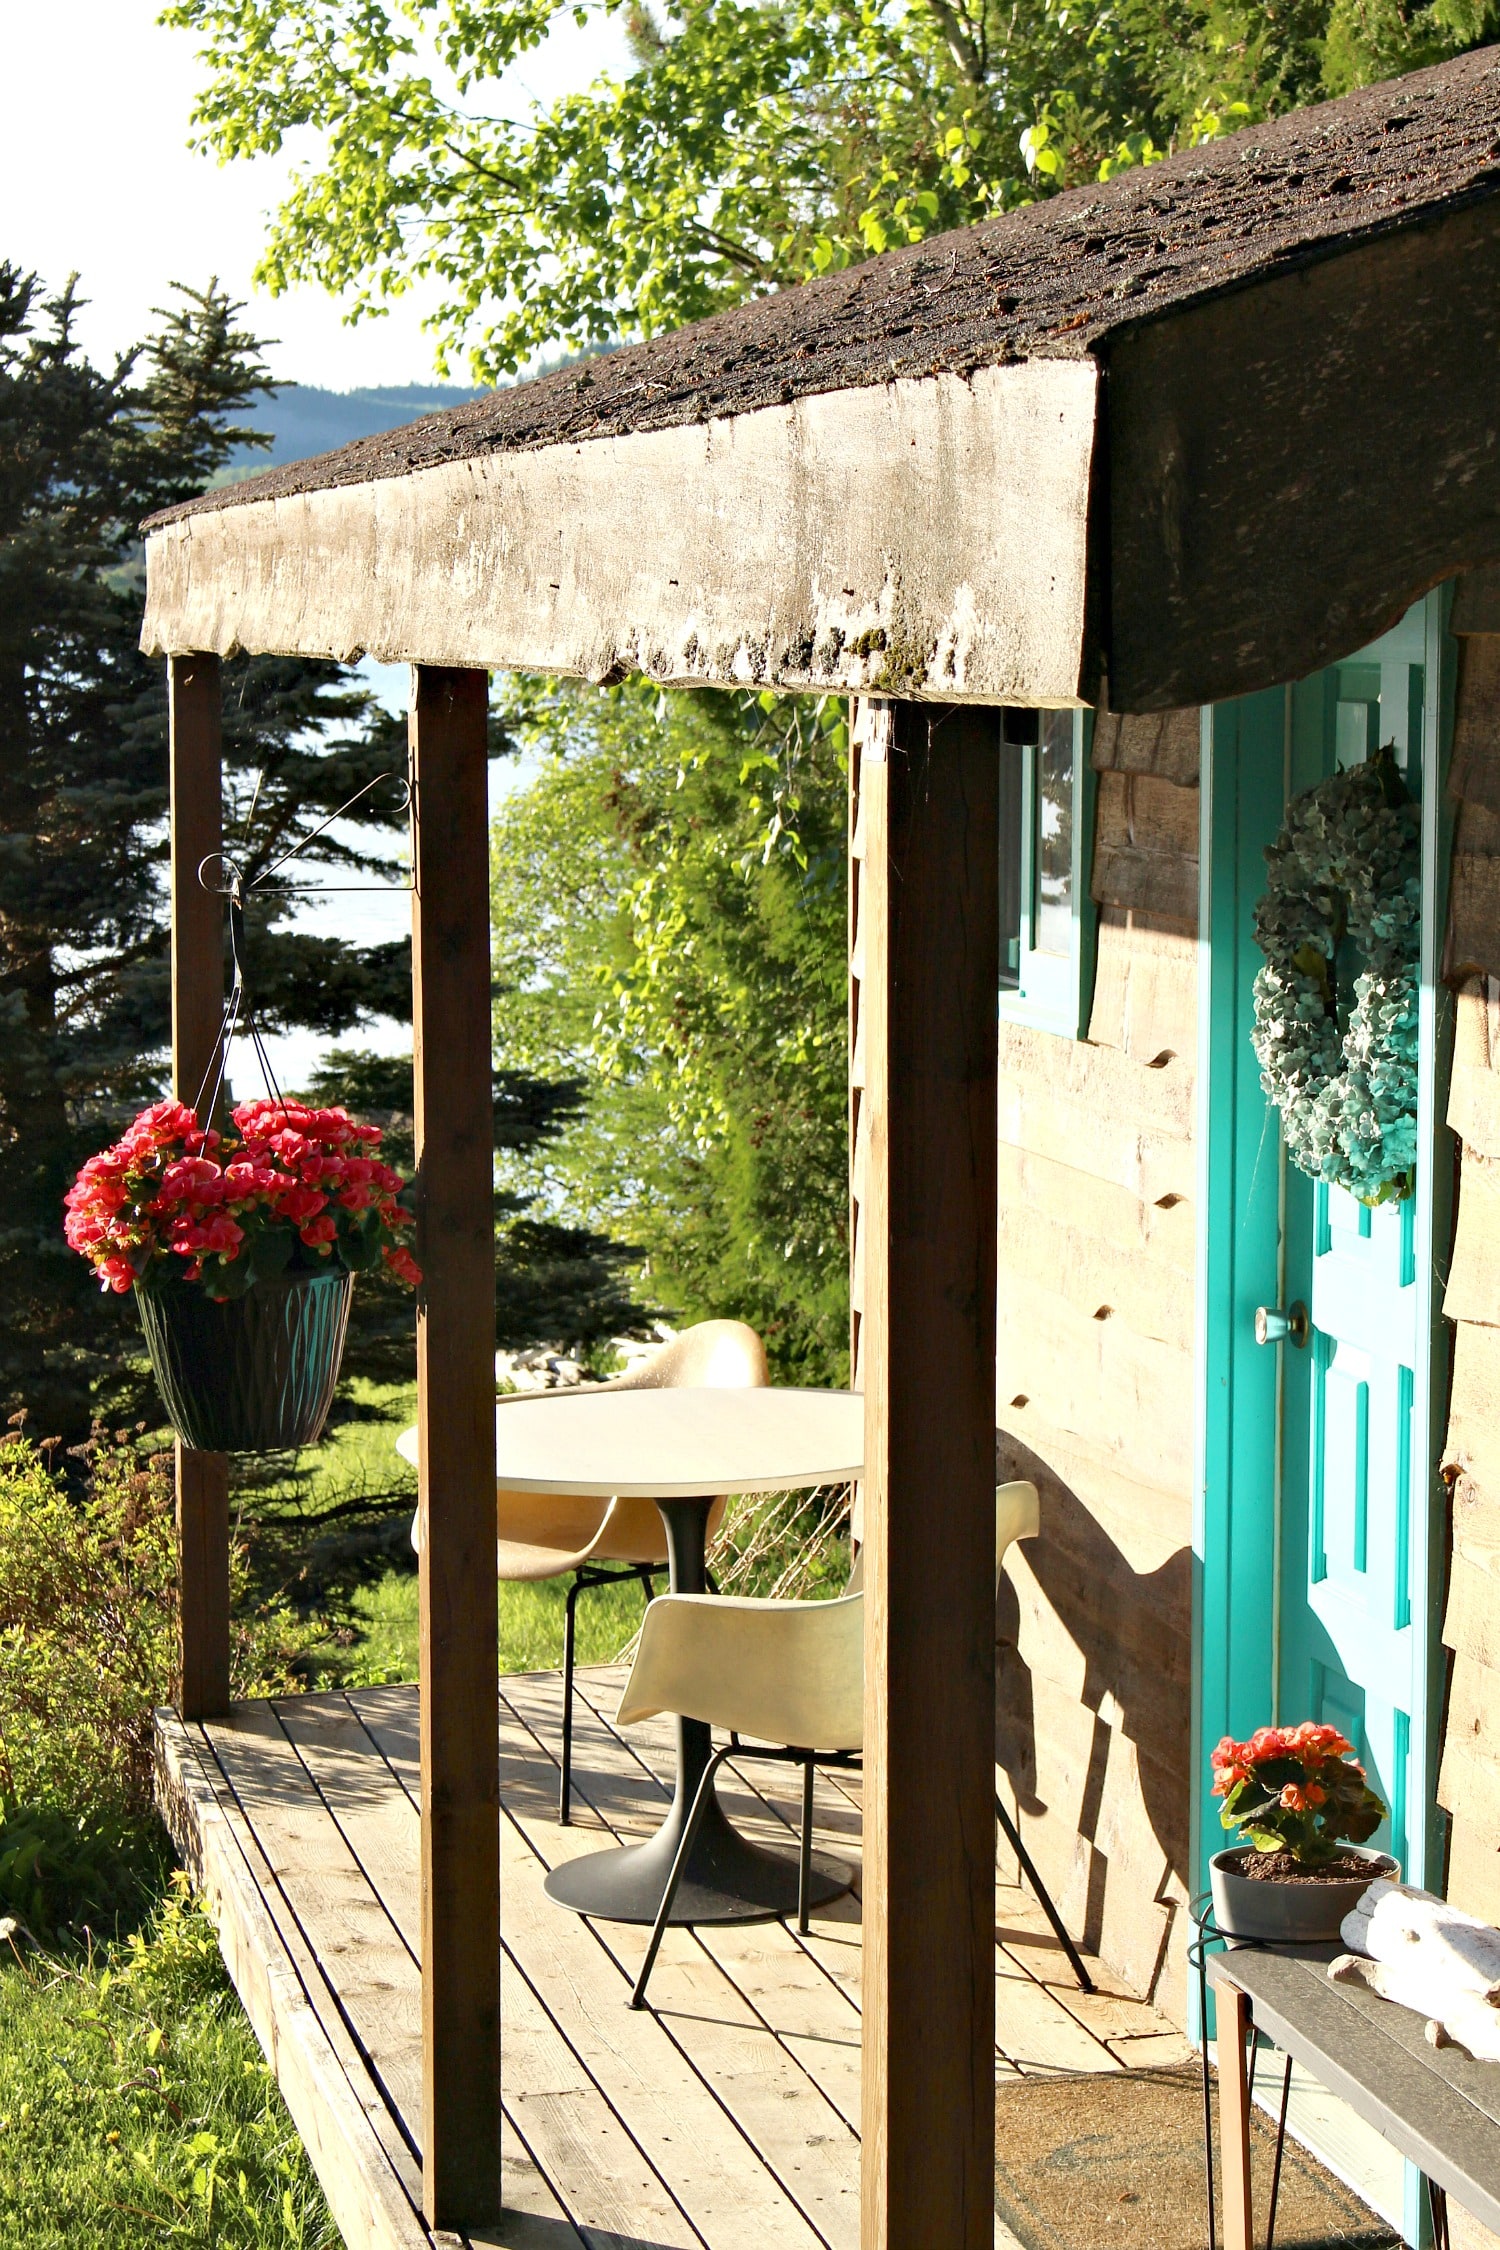
Budget-Friendly Vintage Tulip Table Makeover – Twice
- The Before: A discarded, lonely vintage tulip table base picked up at a yard sale for just $5.
- The Idea: A clever MCM hack on a budget. We paired the vintage base with a heavily modified pre-fab pine top to create a high-end mid-century look for a fraction of the price.
- Pro Tip: When modifying a pre-fab pine top for an MCM look, beveling the bottom edge completely transforms the profile, instantly giving it that sleek, vintage retro vibe instead of a chunky, rustic feel.
I found this vintage tulip table base at a yard sale for $5 and held onto it for years, waiting for the perfect project. Finally I gave it a chic makeover for my mom’s budget-friendly kitchen makeover! I spray painted the base a matte gold, which warmed up her grey and pink kitchen design. To keep costs low, while getting that mid-century modern aesthetic, we hacked an inexpensive round pre-fab pine tabletop, adding a new edge to make it look much more authentic to the MCM era. I stained the pine white. We paired it with two of my mid-century teak dining chairs, now recovered in apricot tweed.
When my Mom no longer needed this table, I repainted the base matte black and now I use this table on the bunkie deck in the warmer months, along with the Eames chairs I found in the classifieds for $15.
➜ See the full step-by-step tutorial and product list here: Mid-Century Tulip Table Makeover Before & After
The Vintage Tulip Table Base Before:
The Custom Vintage Tulip Table After:
The DIY Tulip Table Makeover Version 2:
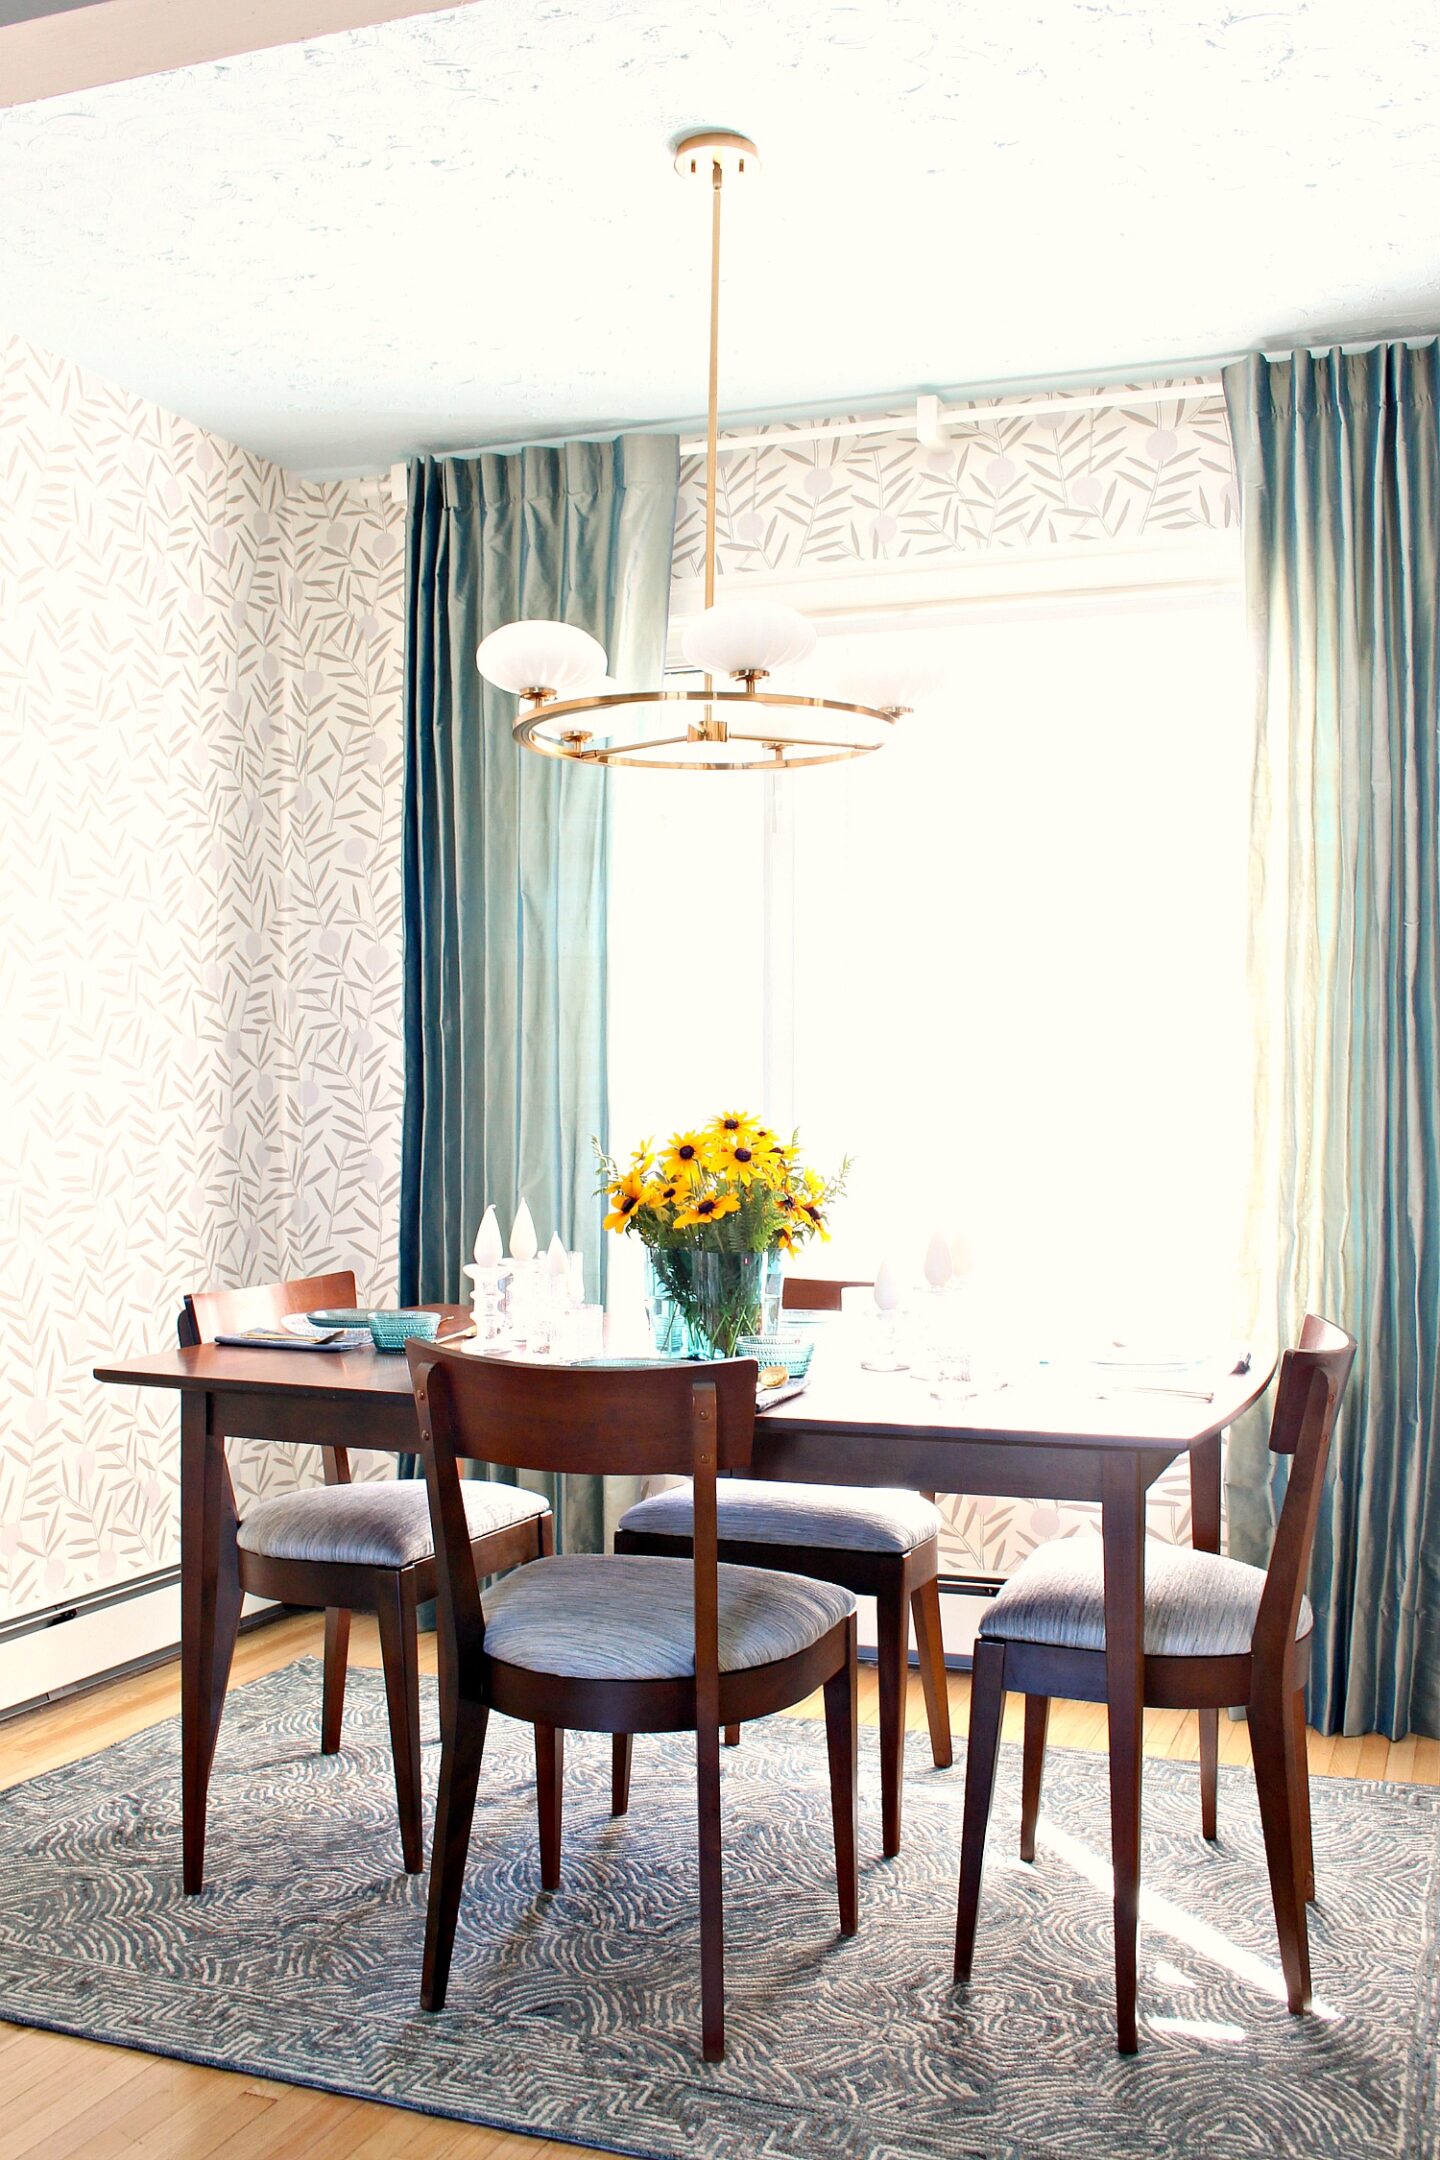
Quick Restor-A-Finish Dining Set Makeover
- The Before: A dark wood vintage dining table and chairs set with a worn, tired finish.
- The Idea: A fast and effective wood refresh combined with a pretty chair upholstery update to complement a complete room transformation.
- Pro Tip: When using a product like Restor-A-Finish, always test a small inconspicuous area first – or be prepared for a larger refinishing project, because this won’t be a perfect solution for every furniture makeover project.
For this vintage dining table and chairs set, I wanted to refresh the wood without spending days stripping and sanding, so I tried Howard Restor-A-Finish for a quick makeover. The results were amazing! To finish the transformation, we recovered the chairs in a gorgeous, light blue/grey upholstery fabric. This cool tone contrasts beautifully with the deeper wood shades and perfectly plays up the other watery hues of the vintage dining room makeover we completed at the same time.
➜ See the full step-by-step tutorial and product list here: Restor-A-Finish Table Makeover Before & After
The Retro Table & Chairs Before:

The Vintage Dining Table & Chairs After:

Sentimental Heirloom Glass Top Table Makeover
- The Before: A worn, matte black vintage table with a glass top that was originally a treasured wedding present.
- The Idea: A repaint project that honors a family heirloom while allowing the color palette to evolve alongside changing home decor styles.
- Pro Tip: When painting furniture with a removable glass top, make sure the paint on the underlying frame is fully cured (usually 2 to 4 weeks) before replacing the glass, or the heavy glass can cause the fresh paint to stick and peel.
This table makeover holds a very special place in my heart. My Mummu gave it to me, and it was originally a wedding present to her and my grandfather. Over the years the original matte black paint became a little worn. She graciously gave me permission to repaint it, and at first, I chose a retro matte mint green paint. Eventually, I repainted it a second time with a luminous pearl white paint. Looking back, all three colors looked beautiful with the unique vintage shape and classic glass top. Like the teak dining chairs and tulip table, this vintage furniture makeover is another example of reimagining and remaking furniture as personal style and decor choices evolve over time.
➜ See the full step-by-step tutorial and product list here: Metal Table Makeover Before & After
The Sentimental Metal Table Before:
The Matte Green Vintage Metal Table After:

The Pearl Paint Table Makeover After:
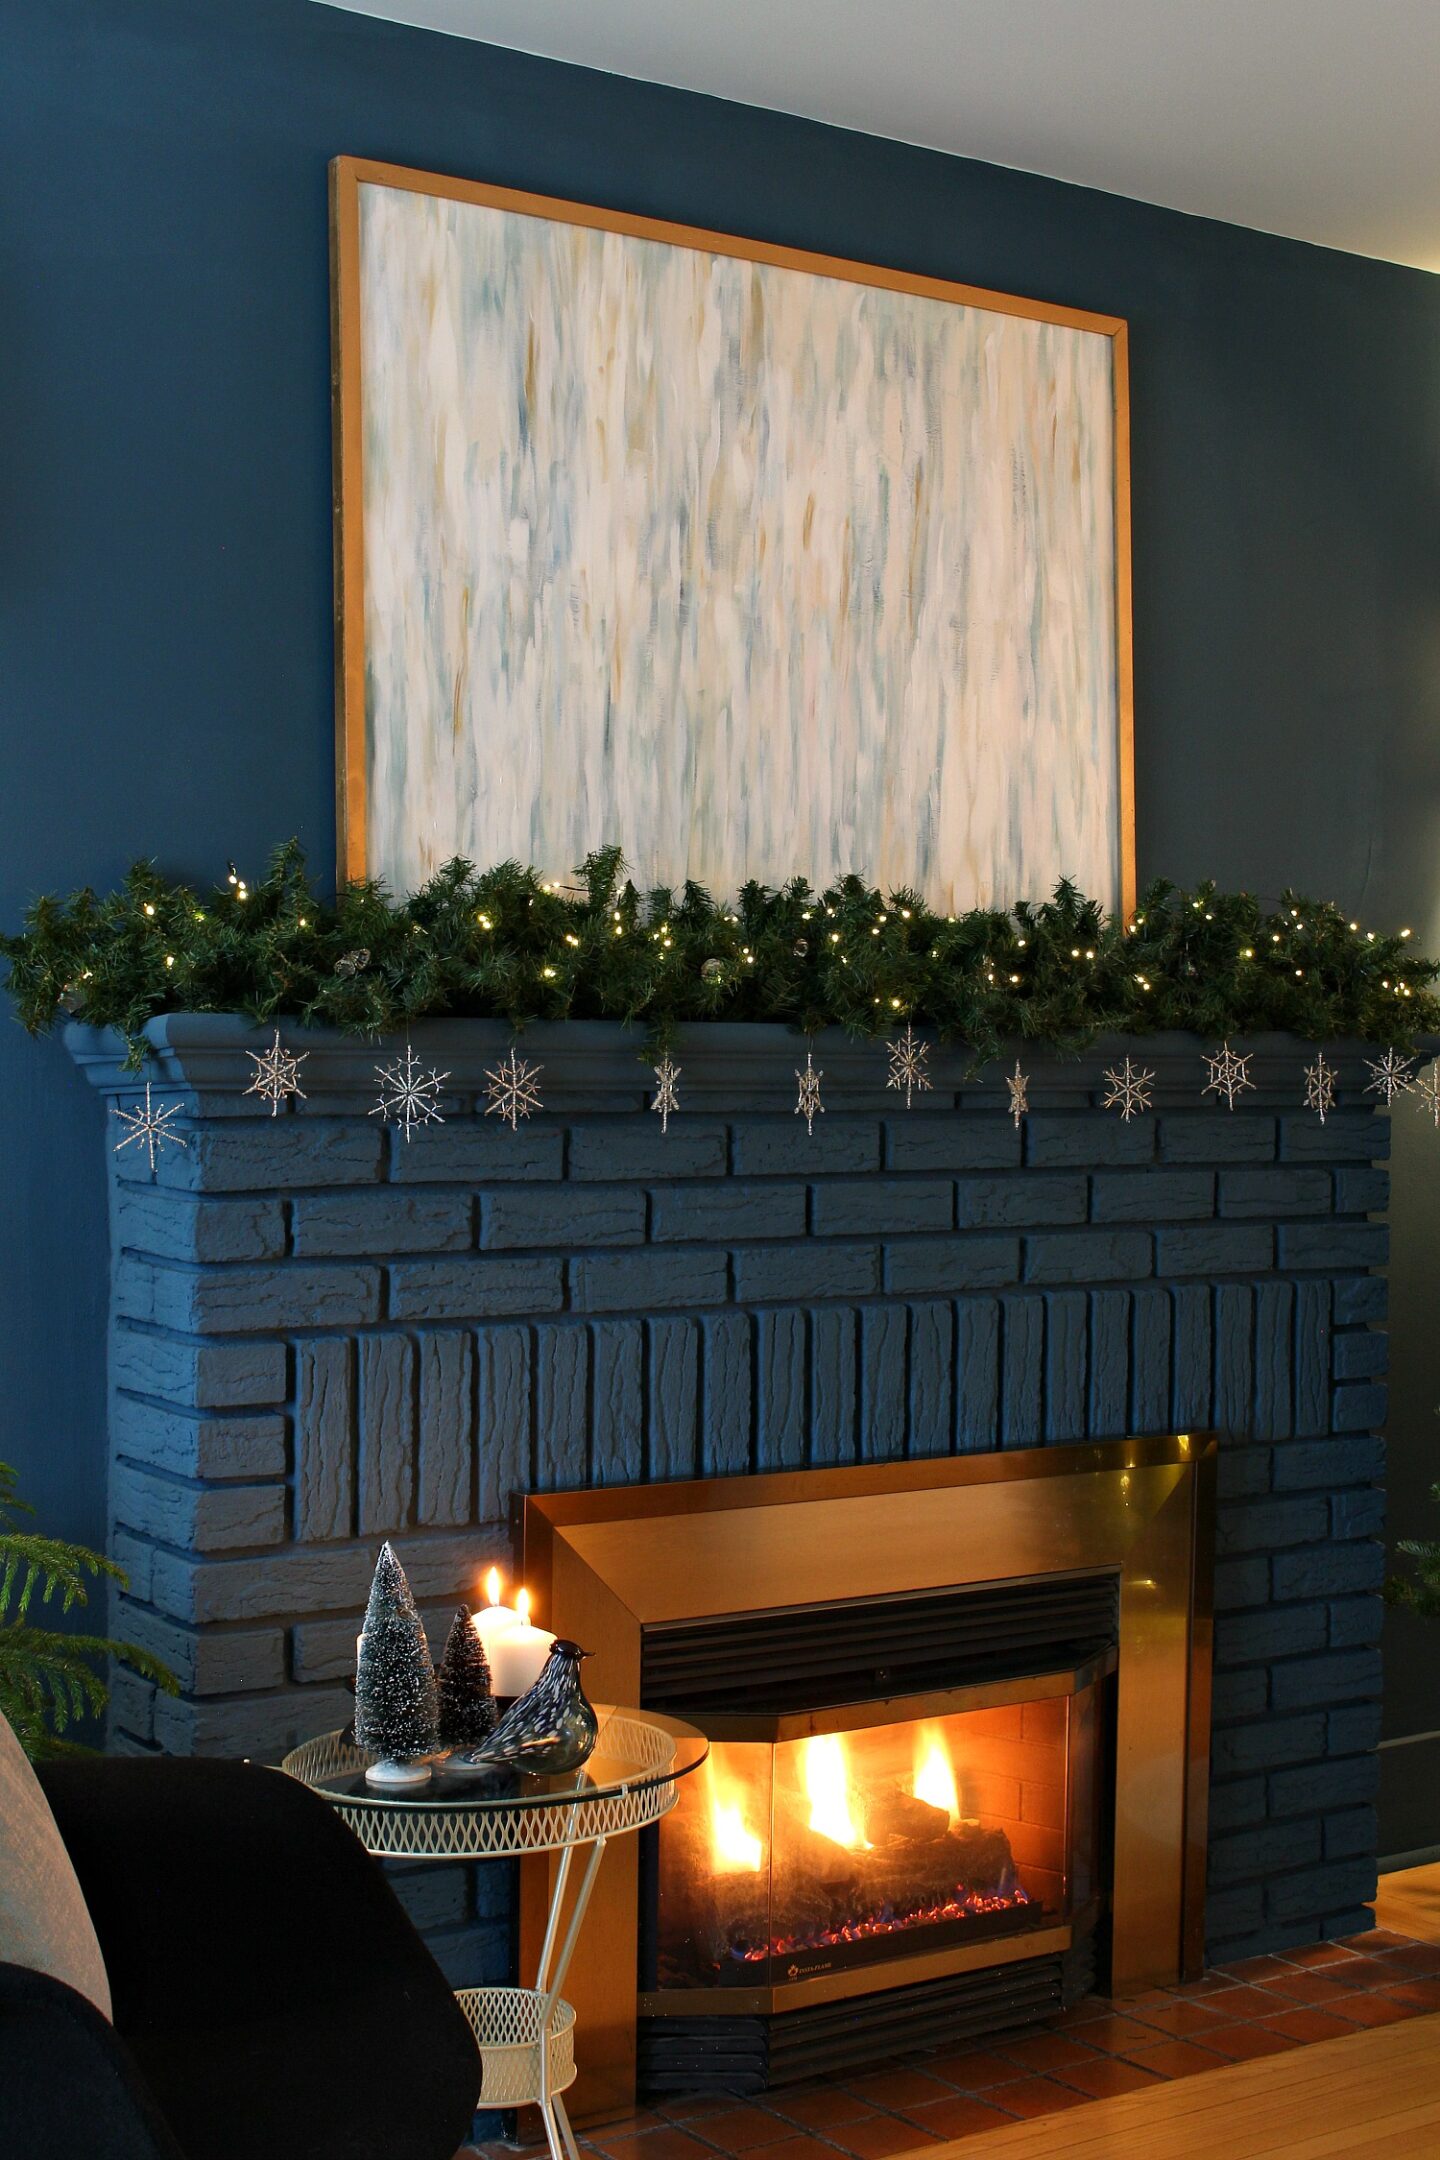
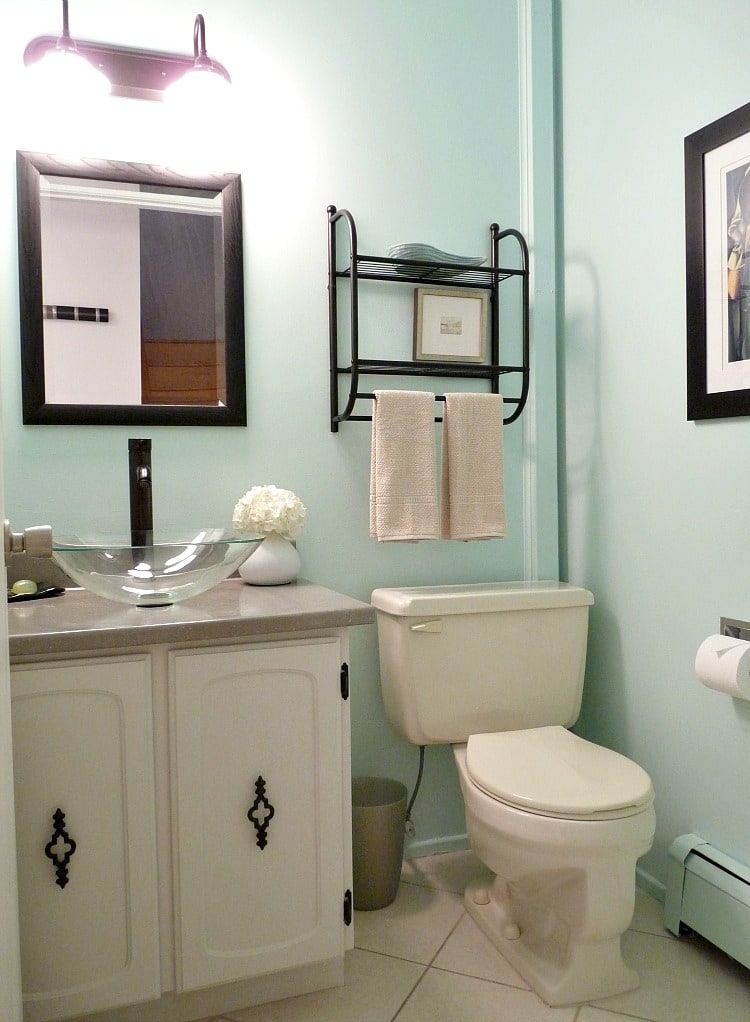
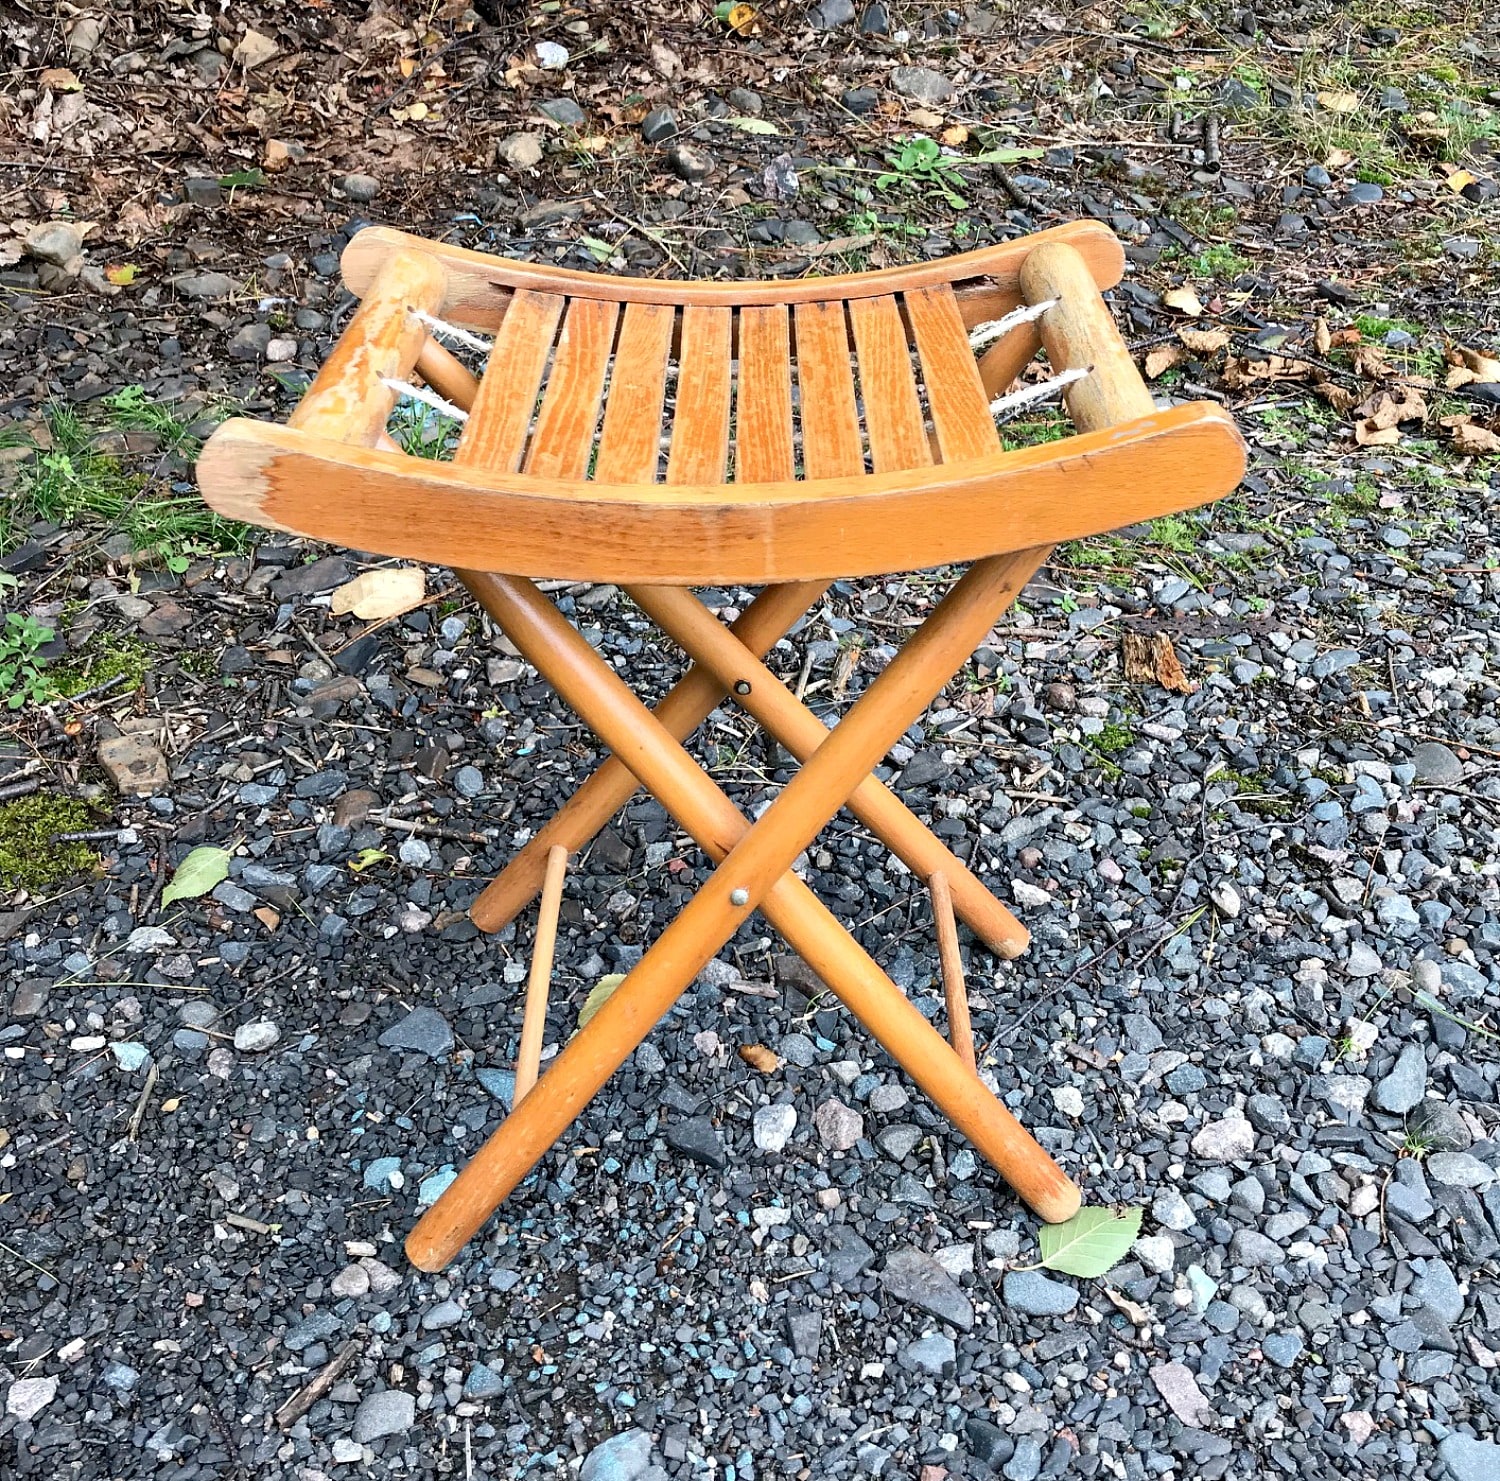
Retro Folding Stool Update
- The Before: A worn-out retro folding stool from my grandparents’ house with tired wood and worn cord.
- The Idea: A quick and easy refresh using spray paint and brand-new cording to save a vintage family piece for a small bathroom.
- Pro Tip: When replacing cord on a retro stool or woven seat, make sure not to choose a material that will stretch out overtime.
This vintage furniture makeover project is a sweet retro folding stool that came straight from my grandparents’ house. Both the original wood finish and the cord were worn from years of use. To bring it back to life, I gave the wood a quick spray paint makeover and completely replaced the old cord with fresh material. It is the perfect size for a compact space, and it now lives happily as a functional accent piece in my bunkie bathroom!
➜ See the full step-by-step tutorial and product list here: Folding Stool Makeover Before & After
The Retro Folding Stool Before:
The Bunkie Bathroom Stool After:
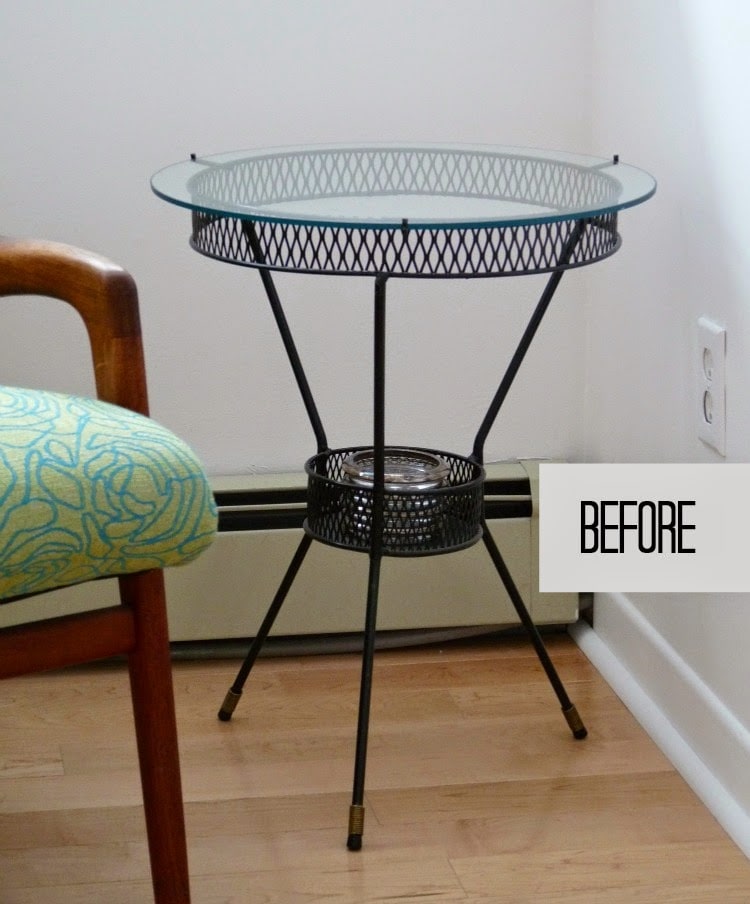
Upcycled Metal Planter Stand with Walnut Shelves
- The Before: A vintage metal planter stand with broken glass shelves that made it completely unusable.
- The Idea: A smart scrap wood upcycle. The damaged glass was replaced with custom-cut leftover walnut plywood, and the metal frame was refreshed with a coat of spray paint.
- Pro Tip: When replacing glass shelves with plywood in a plant stand, make sure to seal the wood with a water-resistant clear topcoat to protect the beautiful walnut grain from water rings and spills during watering.
Never throw away a great vintage piece of furniture just because the glass is broken! Of course, new custom glass shelves are always an option. For a more budget-friendly furniture flip idea, instead of buying replacement glass, I used some leftover walnut plywood from a past project to cut new wooden inserts. I gave the metal frame a fresh coat of white spray paint, which contrasts beautifully with the rich walnut grain.
➜ See the full step-by-step tutorial and product list here: Metal Plant Stand Makeover Before & After
The Broken Plant Stand Before:

The Walnut Shelf Plant Stand After:

Chalk Paint Upright Chest Makeover
- The Before: A classic, cedar-lined upright chest that my Mom bought when I was a kid
- The Idea: A coastal craft room storage solution. The dark wood was completely transformed with an easy chalk paint makeover.
- Pro Tip: Usually I recommend removing, cleaning, and replacing hardware after painting furniture and cabinetry, but for this makeover I just sprayed it all.
This beautiful cedar lined upright chest is a piece my mom had for my entire childhood. When she passed it down to me, I knew it would be the ultimate solution to help organize the massive stash of fabrics in my craft room makeover. To make it match the bright, beachy energy of the space, I gave it an easy chalk paint makeover – with spray paint chalk paint! With no concerns about brush strokes, I painted the entire exterior (hinges and all), but kept the lovely cedar lined interior intact.
(And does it pain me that a cabinet as old as me is now considered “vintage furniture”? Yes. Deeply.)
➜ See the full step-by-step tutorial and product list here: Chalk Paint Furniture Makeover Before & After
The Upright Chest Before:
The Chalk Paint Cabinet After:

Which Vintage Furniture Makeover Is Your Favorite?
Transforming a piece of outdated or discarded furniture takes a bit of vision, and sometimes a little sweat equity, but the payoff of updating a solid, well built piece of vintage furniture into a truly custom piece for your home is well worth it. Whether you are hunting down a rare designer find through online want ads, rescuing a chair from the literal trash heap, or updating a sentimental family heirloom, there is a way to make any vintage piece work for your evolving style.
If you missed any of the step-by-step vintage furniture update tutorials while scrolling through the reveals, you can jump straight to the full project breakdowns here:
- Mid-Century Sectional Sofa Makeover Before & After (Beautiful Vintage Couch)
- Mid-Century Chair Makeover Before & After (Trash Heap Find)
- Vintage Teak Chair Makeover Before & After (Yngve Ekström Score)
- How to Upholster Dining Chairs (Teak Chair Double-Makeover)
- Mid-Century Tulip Table Makeover Before & After (Pre-fab Pine Top Hack)
- Vintage Dining Set Makeover Before & After (Restor-A-Finish Quick Refresh)
- Vintage Glass Table Makeover Before & After (Sentimental Accent Table Project)
- Retro Folding Stool Makeover (Easy Small Space Project)
- Vintage Planter Stand Makeover (Scrap Wood Project)
- Vintage Cedar Chest Chalk Paint Makeover (Craft Room Fabric Storage)
Vintage Furniture Makeover FAQs:
What is the typical cost to reupholster a chair?
The cost to reupholster a chair can vary, depending on where you live as well as the size and complexity of the piece. For my two chair makeovers above, here was the cost: the cost of labor for the Mingo chair was around $400 and the cost of labor for the teal chair was $600. Add to that the original cost to purchase the chairs ($250 and $0) plus fabric (another few hundred for each project).
Is it worth it to reupholster a chair?
When it comes to dining chairs and other easy to reupholster furniture, it’s definitely worth it to reupholster a chair because the materials can be inexpensive. For larger pieces, like a couch or chair, typically professional labor is required and that increases the cost substantially. However, if you find the perfect piece for your space, because you love the style, size, or comfort, you can typically have a chair reupholstered for about the same price as a new chair in a moderately priced furniture store. It won’t be as cheap as IKEA, but you’ll have a quality piece of furniture that’s one of a kind with your own designer touch.
How to Make Old Furniture Look Modern without Paint?
If you don’t want to paint old wood furniture, you can strip and revarnish or re-stain solid wood or veneered wood, to revive wood furniture and change the color and overall style without paint. However, some woods like teak or walnut, can benefit from a good clean (occasionally a light sand) and applying wood oil. For example, teak outdoor furniture can turn grey from the elements but a quick sand and oil can revive the rich, warm wood tone again.
Can I Just Paint Over Furniture without Sanding?
YES! Sometimes you can paint over furniture without sanding. You can use a de-glosser to skip sanding and then proceed with a good quality primer and paint. You can also use chalk paint, which often doesn’t require any sanding.
Is it Worth it to Refurbish Furniture?
Refurbishing furniture can take time, so it’s important to consider the structure of the piece. Is the furniture made from solid wood? Is it built well and in good condition? Older furniture pieces are typically better built than the cheap particle board construction of modern, affordable furniture so you’ll likely find it’s worth the effort.
What Product Makes Old Wood Look New?
Howard Restor-A-Finish can make old wood look new, without sanding and re-finishing wood. It’s a quick way to make old wood look new but it will wear off, in time, and require a fresh application when signs of wear reappear.
How to Make Vintage Furniture Look Modern?
Solid wood is coveted once again, and there’s an eclectic trend happening in interior design that makes space for vintage furniture without the need to modernize it. While paint is often a quick way to make vintage furniture look modern, I’d caution against it! It’s getting more difficult to find good quality, wood furniture. Instead, make vintage furniture look modern with upholstery. Fresh new fabric can modernize a piece. For solid wood pieces with no fabric, consider styling instead of changing the look of the furniture. Contemporary lighting, decor, and art can do a lot to make vintage furniture look modern and fresh in a room.