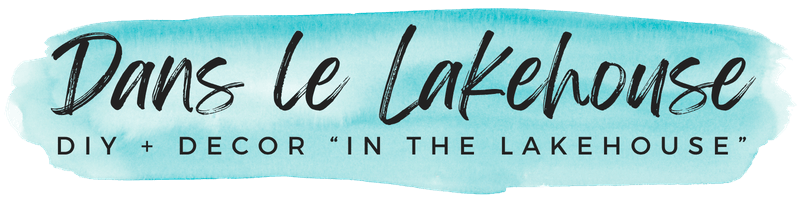
DIY Painted Wooden Spoons
I saw DIY painted wooden spoons on Pinterest and I had to try! Feeling emboldened, I rummaged around in my cooking utensil drawer and found two, inexpensive dollar-store wooden spoons to experiment on. Because the spoons weren’t varnished or coated with anything, I didn’t need to sand and I didn’t bother priming. Lazy!
First, I taped off where I wanted to paint. Knowing the paint won’t be food safe, I only painted the handle part – not the part that goes into the food. It’s up to you where that line is, as everyone uses their kitchen utensils differently. If you want to try the look in a SAFER way, maybe try painting wooden salad tongs – something that isn’t dipped into food the same way as cooking.

After I taped off where I wanted the color to be. I just used the same acrylic paint I use for my artwork (I actually did these while tweaking the bedroom abstracts). I painted on two, super thin layers of paint, letting each coat dry for about an hour. I used a work bench to keep them upright as they dried.

The next day, I remove the tape and applied a super thin coat of water-based varathane finish (we have tons left over from our DIY desk project). I applied the finish just slightly over the painted surface because I didn’t want a really pronounced edge of where the paint and clear coat begin. I let the spoons dry overnight (but will have to refrain from using them for another two days, as per manufacturer’s instruction).
This photo captures the glossiness:

Now I want to grab every single wooden spoon and paint the ends. Again, remember this won’t be food safe, you can use craft paint, leftover wall paint – even stain.
One word of advice: these painted wooden spoons will now be HAND WASH ONLY.


Love the idea of customizing wooden spoons?
Wood Burned Wood Spoon DIY:


Simple but cute! We have a few wooden utensils. I might just have to try this!
Thanks! It would probably be an easy enough project to try with kids, too.
Ohhh cute. Now I want to do this to match my fiesta ware!!
That would look so pretty! I am jealous of your Fiesta ware.
Thanks! I can't wait to unpack 75% of it when we move this summer, it's mostly in boxes in our basement in our rental!
The wooden spoon is my most favorite kitchen tool. And after this–I am gonna love it even more!
Erin from House of Earnest did this recently too! I LOOOOOOOOOOOOVE the colors you used!
Really?!? Cool, I will have to check that out because I haven't ever seen her blog. Thanks for the info 🙂
Cute, I just saw her post. She used a food safe shellac because she painted part of the handle that would touch food. Smart! I only painted the ends of the handle that won't reach into a pot, specifically because my varnish is not stamped "food safe". I LOVE the colours Erin used. Here's the link for anyone else curious:http://www.houseofearnest.com/2012/02/29/have-make-dipped-wooden-utensils/
Loving this DIY project, ALOT!
Wow! Your spoons are fantastic! I love your colors 🙂 And your work bench!
That completely eliminates the need to buy expensive colored spoons from stores like Williams Sonoma and Chefs Catalog. Great idea!
I LOVE these, and actually repinned your pin today!!! Something so simple to add an individual touch to your space – what's not to love? Just read on YHL that the Winter Pinterest Challenge is back! I've been watching for it – it forces me to act on all my pinning inspiration 🙂
I spotted the Pinterest Challenge on YHL too. I can't wait to link up my two pinterest-inspired projects but hopefully I have time to make something new, too. I can't wait to see what you create!
These turned out great! I love how simple yet personalized they are; love the colours you picked out.
Really cute and simple.
They look vintage – well new vintage (if you get my meaning) without any chips. I love them.
Love this idea! So cheery!
oooh. so cute. i love the idea. xo samantha
Oh my God, how cute are these?! Thanks for the inspiration Tanya, I think I'll dip my spoons this coming weekend! 🙂
Just catching up with your site and these are so cute! Well done- yours look even better than the inspiration pic.
I LOVE this!!!! I can imagine my kitchen filled with these now, lol! Your project turned out great.MyersMaison.blogspot.com
I love this project! I'm going to be on the hunt for wooden spoons now!
Cute idea! But you lost me at no dish washer.
Awww, I hear ya! I dishwasher my vintage pyrex and good china. Alas, these are not dishwasher safe. But perhaps with a stain? Wood spoons and bowls tend to dry up in the dishwasher anyway . . . even sans paint.
I've got this one pinned too…love it!!
These look so great Tanya. I'm so inspired to do some of my own 🙂
These are absolutely adorable! I just love how they turned out! :)xo Catharine @ Your Modern Couple
What a GREAT idea, and thanks for sharing!
What a cute idea! Would be great for a wedding gift to coordinate with the brides kitchen colors!
Tanya! I did just see your spoons last night when I was getting caught up on my reading (I do my reading in bulk!). I read often but don't always comment as my browser doesn't like Blogger so I can't comment unless I am using a different browser – odd I know!Meagan
Don't even get me started on browser problems, and blogger problems and wordpress comments. Sigh, I hear ya! I just wanted you to see because we're clearly both loving all things colour blocked!
I love the dipped-dyed effect- really love. I am doing this to all my wooden utensils, too. Is there such a things as too much dipped-dyed? I have done several baskets in kitchen and bathroom, now I am thinking the bar stools, too. Yikes! I am quite taken with it. Thanks for the inspiration!
I'm going to try this for a Christmas gift – wish me luck!
GOOD LUCK!! Remember to make sure they don't put it in the dishwasher – handwash only 🙂
What a gorgeous blog!I love this idea! Such a simple idea and it would make a great activity or the cold easter weather we are having.Check out a similar post of mine that might give you more ideas…http://rueduchatquipeche.blogspot.co.uk/2013/03/diy-how-to-dip-dye-cutlery.htmlXoxo